Render Window
The render window provides options for exposure adjustment and adding post-processing effects. The mainframe of the render windows is part of Rhino’s rednering frameowrk. For details on the rederwindow menus and icons see the Render Windows topic
Pulldown Menus
For details on the rederwindow menus and icons see the Render Windows topic
Toolbars
Save with background alpha channel
Saves image 32-bit PNG, TIF, and BMP including alpha channel background. The Alpha channel versions of the file formats are used for high-quality compositing. Backgrounds will appear black when the rendering is saved with Alpha channel.
Export to native Flamingo nXt file (.nXtImage)
Saves uncompressed luminance and color information. Saves all rendered channels including alpha. The nXtImage files can be opened in the Image Editor where exposure and post-processing effects can be applied and the image re-saved to another bitmap format. The .nXtImage format is the native image format of the nXt renderers. It is the recommended format for storing your renderings, since it preserves the most information about your rendering. Images stored in this format can be manipulated in the nXt Image Editor and special effects can be added. From this editor, you can save to many popular standard formats, including all of the formats supported in nXt. You can also save to Piranesi EPix file (.epx) format.
Export to HDR file
Saves uncompressed luminance and color information. The .hdr format stores luminance data directly in a High Dynamic Range format. Non-luminance backgrounds, such as normal photographs, will appear black when saved in one of these formats.
Export to EXR file
A high-dynamic-range image file format, released as an open standard along with a set of software tools created by Industrial Light and Magic (ILM), released under a free software license. This file format supports 16-bits-per-channel floating-point values (half precision) with a sign bit, five bits of exponent, and a ten-bit mantissa. This allows a dynamic range of over thirty stops of exposure. See: Wikipedia article: OpenEXR. The .exr format stores luminance data directly in a High Dynamic Range format. Non-luminance backgrounds, such as normal photographs, will appear black when saved in one of these formats.
Exit
Closes the render window.
Flamingo Tab Render Window
Progress
Action
Pass
Scan line
Elapsed time
Rays / second
Pixels / second
Render Constraints
Über die Renderbeschränkungen kann die maximale Zeit bzw. Anzahl Durchgänge für ein Rendering festgelegt werden. Die empfohlene Standardeinstellung ist die Deaktivierung dieser Renderbeschränkungen, wobei die Render Engine so lange weiterläuft, bis sie geschlossen oder manuell angehalten wird. Die Einstellungen können mit den Steuerungselementen im Renderfenster angepasst werden. Wenn Anzahl Durchgänge und Zeit auf 0 eingestellt werden, wird das Rendering solange fortgeführt, bis Sie es manuell anhalten.
Zeit
Zur Einstellung, wie lange das Rendering (in Stunden/Minuten/Sekunden) ausgeführt werden soll. Hinweis: Das Rendering stoppt nach dem letzten Durchgang, nachdem die Zeiteinschränkung erreicht wurde. Wenn Sie auf Rendering fortführen klicken, wird das Rendering einen zusätzlichen Durchgang fortgeführt.
Anzahl Durchgänge
Definiert die Anzahl Render-Durchgänge, die das Rendering bearbeitet. Hinweis: Jedes Mal, wenn Sie auf Rendering fortführen klicken, wird der Zähler für die Anzahl der Durchgänge zurückgesetzt. Wenn Sie zum Beispiel die Anzahl der Durchgänge auf 10 einstellen und das Rendering nach dem achten Durchgang stoppen, wird das Rendering fortgeführt, bis 18 Durchgänge erreicht werden. Normalerweise benötigen Renderings 10 - 15 Durchgänge, bis sie in Richtung eines Endresultats konvergieren. Architektonische Innenrenderings können dafür bis zu 30 Durchgänge benötigen.
Adjust Image
The settings that control the screen display also control any image file made from that display. Multiple image files with different exposure settings can be saved from a single rendering. The exposure settings for one rendered image will be applied to the next. This adjustment process is called tone mapping. Tone mapping is the process of converting the luminance data used by Flamingo nXt into Red, Green, and Blue (RGB) pixels that can be displayed or printed.
Brightness
Adjusts the overall brightness of the image. For example, if a white surface in the model is rendering gray, increase the brightness until the surface appears white. Or, if the exterior scene seems overexposed, decrease the brightness until the scene appears more correct.
 Brightness at default (left) and increased.
Hinweis: In nXt kann die allgemeine Helligkeit einer Szene nicht gesteuert werden, indem die Intensität der Lichtquellen verstärkt wird. Die automatische Belichtungseinstellung, die im Tone-Mapping-Prozess integriert ist, vereitelt dies. Passen Sie die allgemeine Szenenhelligkeit an, indem Sie die Option Helligkeit verwenden.
Brightness at default (left) and increased.
Hinweis: In nXt kann die allgemeine Helligkeit einer Szene nicht gesteuert werden, indem die Intensität der Lichtquellen verstärkt wird. Die automatische Belichtungseinstellung, die im Tone-Mapping-Prozess integriert ist, vereitelt dies. Passen Sie die allgemeine Szenenhelligkeit an, indem Sie die Option Helligkeit verwenden.
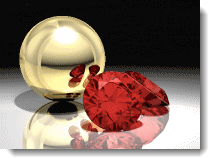
Burn
Adjusts the image white point. This is the brightest white color in the image. Burn can add drama, life, and sharpness to a rendering by adding more areas of white to contrast with the dark areas.
See Wikipedia article: White point.
 Burn at the default setting (left) and increased.
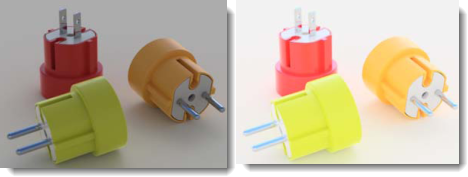
Saturation
Saturation controls the amount of color in the image. A saturation of 0.00 will result in a grayscale image. Values above 1.00 can make colors richer.
 Saturation at the default (left) and increased by about 3 (right).
Histogram
Graphically displays the distribution of the light and dark areas in the image.
See: Wikipedia article: Histogram. The internet has many articles about using histograms to evaluate exposure in digital photography. The principles are the same for rendering.
 Histogram.
Histogram options
Right-click the histogram image for options
Fit
Median
Mean
Show Sorted Graph
Show Scale
Graph Color
Show Luminance Values
Lock exposure
When the exposure settings are locked, changing the lighting will not adjust the exposure to compensate.
Information
Resolution
Displays the render resolution.
Faces
Displays the number of mesh faces used to render the model.
Apparent faces
When there are blocks in the model, Flamingo nXt is able to use the block definition to render block instances without remeshing each instance. The Apparent faces display shows how many additional temporary faces are generated.
Pixel information
Window point Image point Image Y-Up Pixel color Luminance Distance
Lighting information
Presets
Sun
Sky
Lights
Indirect
Ambient On/Off
Channels
Displays the status of the lighting channels.
Effects
Post-processing effects are applied after the image is rendered. These can be turned on and off and re-ordered in the list. Each effect has its own settings.
Effects Options
These options are also available from a context menu.
Right-click an effect to display the context menu.
 Toggle the on/off state of the selected effect.
 Move the selected effect up in the list.
 Move the selected effect down in the list.
 Selected effect properties.
 Save the current effects list order and properties as default.
 Save the current effects list as named list.
 Import named effects list.
Depth of Field
The Depth of Field effect blurs the image depending on the distance from the camera.
Depth of Field Properties
Visual Properties
Blurring strength
Determines the amount of blurring. This is an arbitrary value and different values will work better with different images.
Max blurring
Determines the maximum blurring radius used. Since extremely blurred areas can cause the effect to be slow, this limits the effect.
Area of Effect
Focal distance
The distance from the camera at which the image is in focus (not blurry).
Pick
Pick a location on the image to set the focal distance.
Blur background
Determines whether the background is blurry. The background will be blurred at the maximum effect.
Fog
The fog effect adds depth-dependent coloration in the image. This effect can be used to add a thick fog effect or a subtle depth cue.
 No post processing effects.
Fog as Gradient Background
Fog can be used to create a gradient background.
In this case the settings to create the background are as follows:
Strength = 1Noise = .1Fog Color = BlackEnd distance = approximately 110Start distance = approximately 90Fog Background = OnFeathering = 80
 Fog as gradient background.
Fog Properties
Visual properties
Determines the appearance of the fog effect.
Strength
Determines the maximum amount of fogginess. Setting Strength to 0.0 turns the effect off; setting Strength to 1.0 represents total fog. Values higher than 1.0 can be used but only make sense when used with the Noise.
Noise
Adds a random variation to Fog Strength.
Color
Specifies the fog color.
Click the color swatch to select a color from the Select color dialog box. Click the Pick button to select the color from the rendered image.
Area of effect
Determines the area encompassed by the fog effect.
Start distance
Specifies the distance from the camera at which the fog begins to appear.
Click the Pick button to pick the depth from the rendered image.
End distance
Specifies the distance from the camera at which the maximum amount of fogginess is achieved.
Click the Pick button to pick the depth from the rendered image.
Bounds (Left, Right, Top, Bottom)
Specifies the area of the image affected by the fog. This can be used to create a low-lying mist effect. Click the Pick Area button to pick bounding area from the rendered image.
Fog
Fog background
Determines whether the background image is also made foggy. The background will be fogged at the maximum strength.
Feathering
Determines the number of pixels outside the bounding area to “fade in” the fogginess.
Preview
Preview the effect on the image as you change the values.
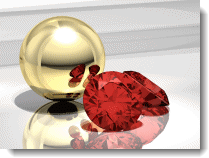
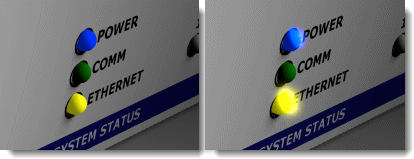
Glare
Glare and Glow are very similar. Whereas Glow uses a selected color, Glare pushes the color to white. Glare makes extremely bright parts of the image appear to glare. It does this by making the area surrounding the bright area brighter. This very subtle effect is usually used for night scenes where it will make the lights seem much more realistic.
 Glare off (left) and on (right).
Glare Properties
White point bound
Determines where in the tonal range the glare will begin. The value is represented on the histogram and can be adjusted graphically. Pixels lighter than the White Point Bound (in either luminance or the grey-scale value) will glare.
Glare size
The radius of the glare around the bright pixel.
Gain
Multiplier for the lightness of the glare. The default value of 1.0 should result in normal glare effects. Use higher values for extremely bright glare.
Use photometric information
When using photometric information, the amount of glare is controlled by how "whiter than white" the pixel is. Otherwise, the effect uses the whitest pixels in the image.
Histogram
Graphically displays the distribution of the light and dark.
Histogram options
Right-click the histogram image for options
Fit
Median
Mean
Show Sorted Graph
Preview
Preview the effect on the image as you change the values.
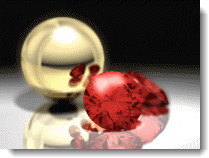
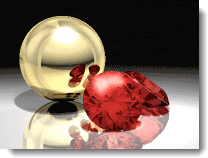
Glow
The Glow effect produces a bright area around specific colors. It can be used to make colored lights or objects like neon lights appear to glow. Select up to 10 colors to affect in the image.
In the illustration, a red color from the ruby is used with the gain set so that the color becomes close to white.
 Glow as sparkle.
 Glow off (left) and on (right).
Glow Properties
On
Turns glow for the corresponding color on.
Color
Specifies the glow color.
Click the color swatch to select a color from the Select color dialog box. Click the Pick button to select the color from the rendered image.
Sensitivity
Controls how much variation on the selected color is permitted when calculating glow on pixels close to that color.
Glow Size
The radius of the glow around the bright pixel.
Gain
Multiplier for the lightness of the glow. The default value of 1.0 should result in normal glow effects. Use higher values for extremely bright glow.
Preview
Preview the effect on the image as you change the values.
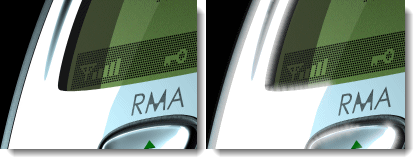
Wires & Text
Overlays curves, text, dimensions, isocurves, mesh edges, and point objects over the rendered image.
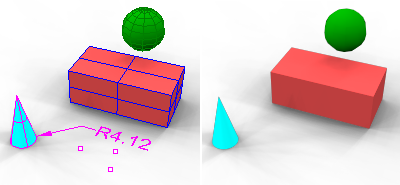 With (left) and without Wires & Text (right).
Wires and Text Properties
Curves
Displays curve objects.
Dimensions and text
Displays dimension and text objects.
Isocurves
Displays surface isoparametric curves.
Mesh edges
Displays mesh edges.
Points
Displays point objects.
Preview
Preview the effect on the image as you change the values.